wit wisdom and food

celebrating shared meals

  • home
  • recipes
  • cookbook club
  • about
  • work with me

Checkerboard cake & Dark chocolate buttercream

October 11, 2015 by anne Leave a Comment

I met my husband 5 years ago today and we have barely been apart since. We were introduced by a mutual friend over an evening of sports. He could probably tell you the exact conversation that brought up birthdays, I just know that it came up. What I learned in that conversation is that just like my parents Tom and I have birthdays that are two days apart, that one of us is two years older than the other and that 16 days into a relationship I was going to need to come up with a birthday present/celebration. For those of you that are math challenged, like myself, Tom’s birthday is October 26th and mine is October 28th.

His favorite NBA team, The Lakers, opened the season on his birthday that year so to celebrate I invited Tom & his roommate over to have dinner with me & my friend Michelle. Dinner I kept simple with chili, but I aimed to impress him with a birthday cake. I made the cake and iced it and was feeling pretty proud as I went to slice it and serve it up. When I cut into it and served the first slice he practically gasped before he said, “checkerboard cake!”

I was certainly hoping he would be impressed, but this was more than I was expecting. Turns out years before his mom let him pick out any cake he wanted from one of her cookbooks. He picked checkerboard cake, the most complicated cake in the book. She made it, but it was never her favorite cake. She didn’t like something about how it turned out and he hadn’t had it since that birthday. I don’t think it is the only reason he decided to marry me, but I am certain that checkerboard cake didn’t hurt my chances.

If you want a cake that will have people in awe checkerboard cake is your cake. It is simple to make, but looks complicated when you cut into the center. There are special pans that will help you make the pattern, but I have never used one and I have always had an impressive checkerboard when I sliced the cake. When I made it last weekend for a celebration at my parents house I used some of my Lindt Chocolate to make a tasty dark chocolate buttercream icing for the cake. Today is your last chance to enter the #choctoberfest giveaway for you chance to win some chocolate, sugar and even more baking ingredients.

For my checkerboard cake I used a Lane cake recipe, which is a sponge cake, from my favorite cake cookbook The Perfect Cake by Susan Purdy. I love so many of the cakes in that book, but not so much the Lane cake. I am sure it is a great recipe, but it requires egg whites to make the cake light and fluffy and I always seem to deflate them when I fold them in. My next checkerboard cake will be made with this recipe from Good Housekeeping or I will make two separate cake batters and make a 4 layer 8-inch cake instead of a 3 layer cake. You could use box cake if you prefer, but it doesn’t save you as much time as you would think.

To make the layers set up 3 cake pans. Pipe the batter in three alternating circles. Two pans will have yellow cake in the center, surrounded by chocolate cake and then a final outside layer of vanilla. One pan will have a layer of chocolate cake in the center, surrounded by yellow cake and then a final outside layer of chocolate. If you make a 4 layer cake you will have two of each. When you assemble the cake the oddball layer will be your center layer. On a 4 layer cake just alternate and you will get a beautiful checkered pattern.

I received Lindt chocolate as part of my participation in #Choctoberfest. All opinions are my own.

An InLinkz Link-up


Dark chocolate buttercream frosting
Print Recipe
  • Coursedessert
Dark chocolate buttercream frosting
Print Recipe
  • Coursedessert
Ingredients
  • 3.5 oz dark chocolate use more for a darker icing - up to 7 oz
  • 2 lbs powdered sugar, sifted
  • 1 lb butter
  • 2 tsp vanilla
  • 6 Tablespoons milk, as needed
Servings:
Instructions
  1. Melt chocolate in the microwave or over a double broiler on the stove. Allow to cool while you make the icing.
  2. In the bowl of a mixer with the paddle attachment, cream the butter until light and fluffy.
  3. Gradually add sugar, frequently scrap down the bowl as you go. Add vanilla and beat until icing is smooth.
  4. Adjust icing to a spreading consistency. If it is too thick add the milk. If too thin add more sugar. You want it to be easy to spread so it doesn't tear the cake when you ice, but not so loose it drips down the sides.
Share this Recipe
 
Powered byWP Ultimate Recipe

Filed Under: baking, desserts, recipes

Back in the Day Bakery Cookbook

October 8, 2015 by anne Leave a Comment

The first time I heard of monkey bread, I was reading the America’s Test Kitchen cookbook. It was one of the first yeast breads I ever tried to make. It turned out well and one piece lead to another, which lead to another and before I knew it the whole batch was eaten. Seeing a chocolate version in the Back in the Day Bakery Made with Love cookbook brought back fond memories of the cinnamon-y version I made years ago. With my new found confidence from my recent baking class it seemed like a good place to start in my month long journey through the cookbook for the cookbook club. It is also fit right in with #choctoberfest with Imperial Sugar. If you haven’t already signed up head over and enter the giveaway. The prize is sure to help with your holiday baking this year.

I received the cookbook from Artisan Books after I reviewed their book The Picnic. I wasn’t particularly excited to make anything from the book and honestly didn’t open it for months. I finally opened it because when I asked the cookbook club which cookbook they would be more drawn to between baking and vegetarian, baking won. I haven’t stopped thinking about the book since I read it a week ago in preparation of featuring it.

I kind of figured it would be complicated recipes that they only make at the bakery. Nothing I would want to spend hours making. I was wrong. There are some challenging recipes, but most are good for early to intermediate bakers. You can tell it is written by chefs though because there are descriptions like, “mix until a smooth dough forms”. I have no idea what that means. Should it still be clinging to the bowl? should it be shiny? should it be sticky? What exactly does that mean in relation to dough? I rolled with it fingers crossed that I did it correctly.

chocolate bubble bread

And the recipe tasted delicious. It didn’t look perfect, but no one in our house seemed to mind. My pan was a little small, they suggest a 9×5 loaf pan and mine was more 7×3, but it still tasted delicious. Like the monkey bread I made before you could do this in a bundt pan instead of a loaf pan, in case you too don’t have 9×5 loaf pan. The bundt pan would allow for the delicious lemon glaze to hit more pieces of bread!

Now that I have cracked this cookbook I am eager to try a few more of these recipes. Banoffee Pie and their trick for making caramelized milk in a slow cooker will be up later this week. I know I need to get the mexican spice cake in the mix and there are some savory recipes like, Sweet Potato PotPie that are irresistible. It is going to be a fun month. To hear more about these recipes come discuss this book and others with us in the cookbook club Facebook group. We would love to have you join the conversation about cooking and find some new cookbooks to try.

I received a copy of this book from Artisan Books. I was not otherwise compensated or obligated to write about this book and the ideas and thoughts here are my own.

*This post contains affiliate links, which means that if you click on one of the product links, I’ll receive a small commission, at no cost to you, if you make a purchase after clicking on the link.

 “

An InLinkz Link-up


”

Chocolate Bubble Loaf
Print Recipe
This is a recipe from the Back in the Day Bakery cookbook. If you love this one I highly recommend picking up the cookbook and making a road trip to Savannah, Georgia to have them bake for you.
  • Coursedessert
Servings
1 loaf
Servings
1 loaf
Chocolate Bubble Loaf
Print Recipe
This is a recipe from the Back in the Day Bakery cookbook. If you love this one I highly recommend picking up the cookbook and making a road trip to Savannah, Georgia to have them bake for you.
  • Coursedessert
Servings
1 loaf
Servings
1 loaf
Ingredients
bread
  • 2 3/4 cups all-purpose flour
  • 1/4 cup granulated sugar
  • 1 1/2 teaspoon instant yeast
  • 3/4 teaspoon fine sea salt
  • 4 Tablespoons butter, room temperature
  • 1 large egg yolk
  • 1 cup whole milk , room temperature
chocolate filling
  • 1 cup semisweet chocolate chips finely chopped
  • 2 teaspoons unsweetened cocoa powder
  • 1/2 cup granulated sugar
Lemon glaze
  • 1 cup confectioners' sugar
  • 1 teaspoon lemon zest
  • 2-3 Tablespoons fresh lemon juice
Servings: loaf
Instructions
  1. In the bowl of a stand mixer fitted with the dough hook, combine the flour, sugar, yeast, and salt. Turn the mixer on to low spped and mix the dry ingredients. Add the butter, egg yolk, and milk, mixing until the ingredients come together. Then mix for another 6 minutes, or until a smooth dough forms.
  2. Scrape the dough onto a lightly floured surface, knead a few times and form into a ball. Put dough in an oiled medium sized bowl and cover with plastic wrap. Allow the dough to rise in a warm space, doubling in size, approximately 2 hours.
  3. Make the filling by mixing all ingredients (chocolate chips, cocoa powder, sugar) together in a bowl Lightly spray a 9x5 inch loaf pan or bundt pan with nonstick spray.
  4. Remove the risen dough from the bowl and gently press and shape it into an 8 inch square. Cut the dough into 16 equal pieces. Form each into a round ball.
  5. Arrange 8 of the dough balls in the bottom of the prepared pan. Sprinkle with half of the chocolate filling. Arrange the remaining dough balls on top and sprinkle with the remaining chocolate filling.
  6. Cover the pan loosely with plastic wrap and allow the dough to double in size in a warm place, approximately an hour.
  7. Preheat the oven to 325°F.
  8. Put the loaf in the oven for 20 minutes. Rotate the pan and bake for an additional 10-15 minutes or until the internal temperature reaches 190°F. You can test this using an instant read thermometer. Cool loaf in pan on cooling rack for 10 minutes.
  9. Make the glaze in a small bowl by stirring together all ingredients until smooth. If necessary thin the glaze with more lemon juice.
  10. Remove the loaf from the pan and place on a serving tray. Drizzle glaze over the top and serve warm.
  11. Bread will keep for 3 days in an airtight container.
Recipe Notes

If, like me, you want to make sure they balls of dough are exactly the same size, weigh the dough in ounces, divide by 16. Then measure out 16 pieces of dough that are that weight. For example my dough weighed 28 oz so I ended up with 16 pieces that weighed 1 3/4 ounces.

Share this Recipe
Powered byWP Ultimate Recipe

Filed Under: baking, book club, cookbook club, recipes

Cookie Butter Cheesecake Brownies

October 6, 2015 by anne 2 Comments

There are only a handful of reasons you might not have heard of cookie butter…

  • you don’t use pinterest
  • you don’t live near a Trader Joe’s
  • you don’t have a sweet tooth

If it isn’t one of those reasons you are an anomaly. I wouldn’t consider that a horrible thing when it comes to cookie butter. Some days I wish I had never heard of it too. When it first came to the store it was all the rage with people buying it by the case. Stories about eating it straight out of the jar with a spoon. I never got bit by the cookie butter craze, but the addition of cookie butter cream cheese to the dozens of products that have cookie butter in their title gave me an idea.

I am going to back up a second and describe cookie butter for those of you that don’t know what it is or haven’t had the chance to try it. Cookie butter is the consistency of peanut butter and is made from crushed up speculoos cookies. Speculoos cookies are a spiced shortbread cookie from the Netherlands. These crushed up cookies give cookie butter a flavor that might remind you of gingerbread. I think we can all agree that the smells and flavors of gingerbread are pretty alluring. If you can’t agree on that you might need to get your sniffer checked out, cause I think it might be broken.

Back to the idea I had with the cookie butter cream cheese.

The first thing I think of with cream cheese is bagels. I don’t care for bagels and cookie butter just doesn’t strike me as a morning food. Way too sweet. Now as a dessert cream cheese takes on new forms, primarily that of cheesecake which I love. But a cheesecake made of just cookie butter cream cheese sounded horrible too. Then I remembered cheesecake brownies and it all came together.

I have to admit the photos on the internets of cheesecake brownies have much more distinguished layers of cream cheese. I think I fell victim to over thinking swirling the layers together. Less swirl = better look. However, the taste doesn’t change. I could have eaten the entire tray of these. I was lucky to have some Lindt Dark chocolate from #Choctoberfest that made the brownies even better. Quality ingredients always have a way of improving things. Which is also why I used some of my supply of Imperial Sugar on this recipe as well. If you want to get some of these ingredients be sure to enter the #Choctoberfest giveaway.

I am looking forward to multiple projects using the Imperial sugar. If I could enter the giveaway for any product it would be to see more of this sugar show up at my doorstep.

Enjoy the brownies. They are sure to be a hit at your house. If you are one of the unfortunate souls that doesn’t have a Trader Joe’s try another cream cheese…maybe pumpkin.

I received Imperial sugar and Lindt chocolate as part of my participation in #Choctoberfest. All opinions are my own.

An InLinkz Link-up


Cookie Butter Cheesecake Brownies
Print Recipe
Servings
12 brownies
Servings
12 brownies
Cookie Butter Cheesecake Brownies
Print Recipe
Servings
12 brownies
Servings
12 brownies
Ingredients
cheesecake layer
  • 8 ounces cookie butter cream cheese
  • 1/3 cup Imperial granulated sugar
  • 1/2 teaspoon vanilla extract
  • 1 large egg
brownie layer
  • 2 ounces dark chocolate
  • 3 Tablespoons unsalted butter
  • 2 Tablespoons vegetable oil
  • 1 cup all-purpose flour
  • 1/2 cup dutch-process cocoa
  • 1 teaspoon baking powder
  • 1/2 teaspoon salt
  • 3/4 cup brown sugar
  • 1/2 cup Imperial granulated sugar
  • 1/2 cup milk
  • 2 large egg whites
  • 2 teaspoons vanilla extract
Servings: brownies
Instructions
  1. Preheat the oven to 350°F. Line a 8x8 pan with foil so it hangs over the edge and spray with cooking spray.
  2. Make the cheesecake topping: In a bowl use an electric mixer to beat the cream cheese until smooth and creamy. Beat in the sugar, and vanilla until smooth. Beat in egg until well combined and set aside.
  3. Melt chocolate, butter and oil together either in the microwave or over a pan of boiling water.
  4. In a separate bowl combine the flour, cocoa powder, baking powder, and salt.
  5. Combine the brown sugar and granulated sugar in a large bowl. Combine the milk, egg whites and vanilla. Add the cooled chocolate mixture and whisk until fully combined. Gradually add the flour mixture and stir until just combined.
  6. Set aside 1/2 cup of brownie mixture. Pour remaining brownie mixture into prepared pan. Pour cheesecake mixture over the top of brownie mixture. Put dollops of the resereved brownie mixture over the top. Swirl through only the top two layers to create the swirled pattern.
  7. Bake until set, 40-45 minutes depending on oven. Let cool completely before lifting brownies out of the pan.
Share this Recipe
 
Powered byWP Ultimate Recipe

Filed Under: baking, desserts, recipes

quick and easy jambalaya

September 13, 2015 by anne Leave a Comment

Welcome to the first sunday of the football season. In our family this is a very big deal. I grew up a football fan and have become even more of a fan over the years. This is my 11th season playing fantasy football. Like many years I am in multiple leagues this year, three to be exact. The work one, the ladies only league and the family league.

The other two are fun, but the family league is on another level. There is a trophy, which I won in the inaugural season, an active message board with lots of smack talking and some teams even create weekly videos. If you have seen the tv show The League that is what this league is like, minus debauchery and collusion, though sometimes we wonder about the collusion.

This year my fictional team, the Haunting Voodoo Kickers, has relocated to New Orleans. It seems only fitting with this move that food should be my contribution to the league. I was going to share this recipe on the league message board, but think in the spirt of generosity I should share it with everyone.

Not a fancy jambalaya, but the first one I ever had and the one my mom made for years. It was handed down from a friend of hers years ago. Still written in my mom’s handwriting on a recipe card it is one of my most cherished recipes. Jambalaya is actually a big deal in our family. My brother has his version, my parents have theirs and I still roll with tradition. Tom has generously offered to a judge a jambalaya cook-off between the three of us. Feelings are sure to be hurt if that ever happens.

This recipe is quick and easy. If you head to the store now you can have this prepped and ready for tonights dinner. If you are on the east coast you can have it ready for the end of the 4 o’clock games. If you are on the west coast you can have it done for half-time of the late game. Have a great first Sunday of NFL football and GO COLTS!

quick and easy jambalaya
Jambalaya
Print Recipe
quick and easy weeknight jambalaya.
Servings Prep Time
4 people 15 minutes
Cook Time
45 minutes
Servings Prep Time
4 people 15 minutes
Cook Time
45 minutes
quick and easy jambalaya
Jambalaya
Print Recipe
quick and easy weeknight jambalaya.
Servings Prep Time
4 people 15 minutes
Cook Time
45 minutes
Servings Prep Time
4 people 15 minutes
Cook Time
45 minutes
Ingredients
  • 1/4 lb bacon, diced
  • 1/2 cup diced onion
  • 2 medium green pepper cut in 1 inch strips
  • 1 cup long grain white
  • 2 tsp garlic, chopped
  • 24 oz canned whole tomatoes
  • 1/2 tsp dried thyme
  • 1 tsp salt
  • black pepper to taste
  • 1 1/2 cup chicken broth
  • 1/2 cup vermouth (optional)
  • 1/2 lb diced ham steak
  • 1/2 lb andouille sausage, diced
  • 1 lb medium shrimp shelled & devined
Servings: people
Instructions
  1. In a dutch oven, fry bacon. Add onion and cook until transparent. Add green pepper and let soften a little. Add rice cook until opaque and milky,
  2. Add garlic, tomatoes, thyme, salt and pepper. Pour in chicken broth, vermouth if using and bring to a boil.
  3. Reduce heat to a simmer. Add ham and andouille. Cook until water is absorbed. Add shrimp at the end. When shrimp are done serve.
Recipe Notes

Double the batch and freeze for leftovers.

Share this Recipe
Powered byWP Ultimate Recipe

Filed Under: dinner, recipes

why I use yummly and hope you will too

August 5, 2015 by anne Leave a Comment

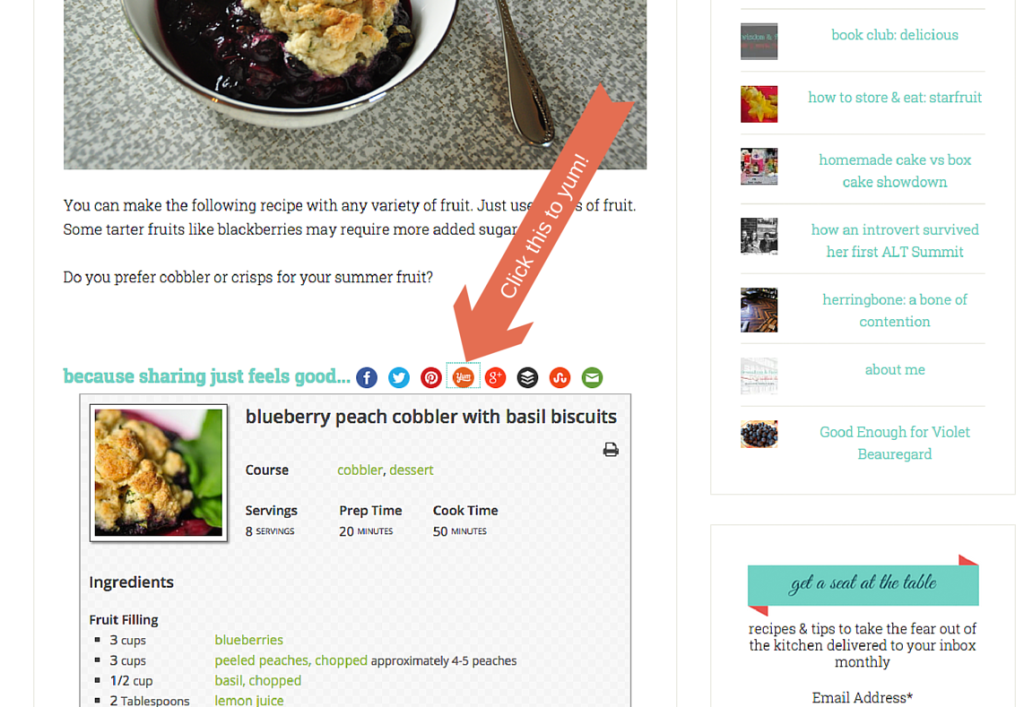
Let’s say for a moment you find yourself on Wit Wisdom and Food, that up and coming food blog you love, and you want to save the delicious recipe for blueberry peach cobbler. You could certainly put it on Pinterest and you might remember to go to it again.

I have a better idea you could put it in your Yummly recipe box. A box you can organize by category and can access with an app at the grocery store. An app that allows you to access all the ingredients you need with fewer steps and less bandwidth than Pinterest? Would you be interested?

As an added bonus this little button that is so easily provided for you, as the image below shows, helps out that up and coming food blogger that you love so much. Do you think just maybe you could give it a try?

Click this to yum!


While this really would help me out I believe it is one of the better websites and apps out there for recipe storing and searching. I still love Pinterest who doesn’t, but it isn’t convenient when I quickly run into the store for tonight’s dinner to search through and scroll my multiple boards. Then once I find the photo I have to wait for the site to load and scroll through the likely blog post.

Yummly cuts all that out for you.

Just click on your recipe box find the recipe and the ingredient list for the recipe will pop up. When you get home you can click-through to the recipe and get the full recipe and instructions.

It is the only recipe app I have on my phone right now because I can save recipes from any site to that recipe box and have them quickly at my disposal.

Are you on yummly?

If you already have a recipe box you can find my recipes at the Wit Wisdom & Food page. I would love it if you stop by and yum a few of your favorite recipes.

Filed Under: recipes, Uncategorized

pickled radishes quick

August 5, 2015 by anne 2 Comments

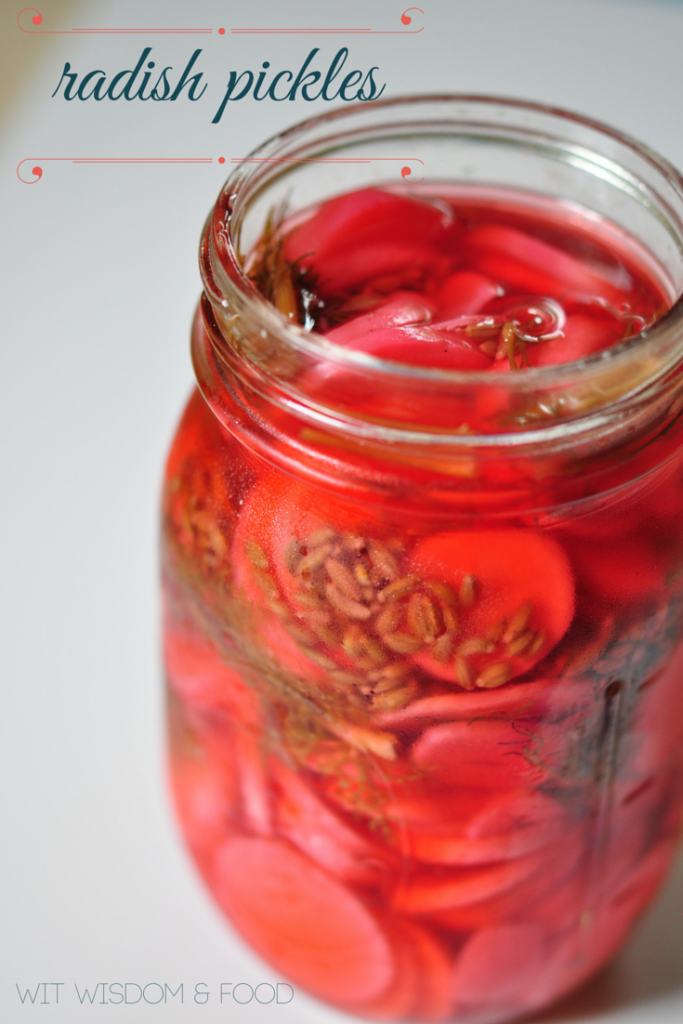
radish pickles quick

There is a misconception that pickling something has to take all day. This must come from the images of grandmothers sitting in the kitchen with bushel after bushel of cucumbers making enough pickles to last all winter. I know that is what I think of, well not grandma, but my mother. She would spend days putting the garden bounty to good use. Let’s all wipe that image from our heads and get ready to learn how to make pickles in under an hour.

The pickles, or quick pickles as they are frequently called, won’t last you the winter but they will go a good couple of weeks in the fridge. That is assuming you don’t eat them well before a few weeks are up. You can use the same process to can pickles that will last through the winter. If that is your goal you can make enough for a family of 4 in an afternoon. You can learn more about that process and get some recipes from this article I wrote for Wayfair.

Today we are on quick pickles. The sky is the limit with this method. You can pickle darn near anything. To prove the point I had some pickled blueberries on a sandwich the other day. They were delicious and likely made in the exact same way as these radishes. I am looking into this so we can have them on a salad in the near future. I will be sure to get back to you when I have them finished.

My radishes were inspired by The Picnic Cookbook which was the first cookbook for the cookbook club. They listed a variety of vegetables you could do such as beets, green beans, fennel and the traditional cukes. I took a little spin on this because radishes were on sale, they sounded good and apple cider vinegar was all that I had on hand. I was very happy how they turned out and couldn’t stop eating them once I opened the jar. They were a perfect topping for a pork tenderloin sandwich the other night.

The basic process is to prep a fruit or vegetable of your choice, make a brine, pour brine over said fruit or vegetable and refrigerate. Since you aren’t trying to store these at room temperature you don’t have to be as concerned with the acid levels and the safety of the food. This allows you wing the recipes a little more than you can with traditional canning. Big win for you. You can experiment with vinegars, seasonings and ratios to water until you find your perfect mixture.

Before this did you think all pickling was hard or took all day?

pickled radishes
Print Recipe
Quickly pickled radishes that are good for sandwiches, burgers, salads or a quick snack.
  • Coursecanning, vegetable
Servings Prep Time
1 jar 15 minutes
Cook Time Passive Time
20 minutes 4 hours
Servings Prep Time
1 jar 15 minutes
Cook Time Passive Time
20 minutes 4 hours
pickled radishes
Print Recipe
Quickly pickled radishes that are good for sandwiches, burgers, salads or a quick snack.
  • Coursecanning, vegetable
Servings Prep Time
1 jar 15 minutes
Cook Time Passive Time
20 minutes 4 hours
Servings Prep Time
1 jar 15 minutes
Cook Time Passive Time
20 minutes 4 hours
Ingredients
  • 3/4 lb radishes greens removed
  • 4 fennel fronds
  • 5 cloves garlic, sliced
  • 1 Tablespoon fennel seeds
  • 1 1/4 cup apple cider vinegar
  • 1 cup water
  • 2 Tablespoons wildflower honey
  • 1 1/2 teaspoons kosher salt
Servings: jar
Instructions
  1. rinse radishes and slice in 1/4 inch rounds
  2. Pack radishes, fennel frond and garlic into a half-pint canning jar.
  3. Put fennel seeds, apple cider vinegar, water, honey and salt in a sauce pan and heat to a rolling boil. Stir to dissolve honey and salt.
  4. Remove brine from heat and pour over radishes. Make sure the radishes are covered by the brine
  5. Allow the brine and radishes to come to room temperature, 70°F. This should happen within 2 hours. Cover jar and place in fridge.
  6. Let cool completely. For the best pickles leave them for at least a day before eating. Will keep in the fridge for about a month, or until you eat them all. Whichever comes first.
Share this Recipe
Powered byWP Ultimate Recipe

Filed Under: canning, recipes

grilled fish with watermelon salsa

July 16, 2015 by anne 4 Comments

Weeknight food should be unpretentious, flavorful and fun. Weeknight summer food should also be refreshing and light with a minimum of oven time.

Grilled fish with watermelon salsa fits the bill on all fronts. Adding the rice adds a bit of oven time but it is minimal and if you are one of the lucky ones with air conditioning you won’t even notice. If you aren’t one of the lucky serve it over lettuce for a delicious summer salad.

I recently finished my first class for culinary school and my fearlessness to create new recipes has skyrocketed. All it takes is a little inspiration. To come up with this recipe I drew from some Pinterest inspiration, a suggestion from my chef at school, a new technique I learned in school and a mental library of flavors and combinations.

I started with Pinterset and the fish. I don’t know how I got to this pin for mahi mahi burrito bowls, but it looked so good I made it the day I saw it. It tasted as good as it looked and we have had it a couple times since. While I like it I wanted to make something that was a little lighter. Something that would be good to eat on hot, humid summer nights. Which for me meant a little less heat and chili flavor. I thought cumin would make a great flavor for seasoning without being overpowering. I had adobo seasoning in my spice collection which sounded like a perfect blend. I figured not everyone keeps adobo on hand so I made my own mixture of this list of spices. With the change to the fish there was going to have to be a change to the salsa. Strawberry and mango go great with heat but didn’t sounds as refreshing as I envisioned. Not to mention it didn’t sound as good with cumin.

Light bulb moment number two. Salsa doesn’t have to always be about the tomatoes, onions and peppers. There are certainly other options, strawberry and mango for instance. I wouldn’t have considered watermelon if the chef teaching my culinary class hadn’t mentioned it. Something about his quick mention of watermelon salsa, had me at the store before I knew it buying watermelon, cilantro, jalapeño and limes so I could give it a whirl. I love making salsa because I find cutting up vegetables very therapeutic. I think my mind clears and my heart rate goes down considerable when I am preparing ingredients for a salsa. I don’t know why it is salsa specifically, but it is one of my favorite food to prepare.

While I love making salsa I used to hate making rice. I have always struggled with making rice. I could never figure it out but I always seemed to cook it past the point of done. When I learned how to make rice pilaf for school and it kept coming out correctly every time I tried it I was in love with the technique. I started to think that if cooking rice is all about the ratio of liquid to water it isn’t really that hard and I could make rice pilaf with just about any liquid. This idea was reinforced by the pinterest inspiration where the rice calls for coconut water and coconut milk. I combined my technique with her idea for coconut water and I was off and running.

I wasn’t sure how my husband would feel about watermelon salsa so rather than ask I just made it and waited to see what he thought. I probably underestimate his trust in my cooking abilities and his adventurousness with food just a bit. He was a little surprised to find out it wasn’t a traditional pico de gallo salsa, but it was a pleasant surprise and we had very few leftovers any night we have this.

The layers of flavors in this dish really work well together. Like I said if you don’t feel like turning on the oven you can easily serve the fish and salsa over lettuce. I would suggest something like a romaine. Salad is also a great option if you manage to have any leftovers.

Thanks to Wayfair for including me as part of the 15 course meal. Check out hashtag #15recipes on instagram to find more of the recipes featured in this meal. I am the 9th so there are already 8 other great recipes and 6 more to come. If you follow Wayfair or myself on twitter you will also get the recap post after all 15 posts have been shared.


grilled fish with watermelon salsa
Print Recipe
Grilled fish with watermelon salsa served over coconut lime rice pilaf
  • Coursefish, Main Dish
Servings Prep Time
4 people 40 minutes
Cook Time
30 minutes
Servings Prep Time
4 people 40 minutes
Cook Time
30 minutes
grilled fish with watermelon salsa
Print Recipe
Grilled fish with watermelon salsa served over coconut lime rice pilaf
  • Coursefish, Main Dish
Servings Prep Time
4 people 40 minutes
Cook Time
30 minutes
Servings Prep Time
4 people 40 minutes
Cook Time
30 minutes
Ingredients
fish
  • 1 pound fish mahi mahi or swordfish
  • 1 Tablespoon cumin
  • 1/2 teaspoon oregano
  • 1/4 teaspoon cayenne
  • 1/4 teaspoon garlic
  • 1/4 teaspoon pepper
  • 1/4 teaspoon salt
  • 4 Tablespoons oil olive or melted coconut oil
  • salt and pepper
  • 1 lime
watermelon salsa
  • 4 cups diced watermelon
  • 1/2 cup diced onion
  • 1 jalapeño, seeded and diced
  • 1/2 cup cilantro, finely chopped
  • 1 lime, juiced if making rice zest lime and reserve zest
  • salt and pepper to taste
coconut lime rice pilaf
  • 1 Tablespoon clarified butter or ghee
  • 1 Tablespoon olive oil
  • 3 Tablespoons onion, finely diced
  • 1 cup long grain white rice
  • 1 cup coconut water
  • 1 cup coconut milk
  • 1 zest of lime
  • salt to taste
toppings
  • 2 avocados, diced
  • 2 cans black beans, rinsed
  • fresh cilantro
Servings: people
Instructions
prep
  1. Mix cumin, oregano, cayenne, garlic, pepper and salt with olive oil.
  2. Season fish with salt and pepper and pour olive oil mixture over fish. Coat fish evenly and put in fridge until ready to grill.
  3. Mix diced watermelon, onion and jalapeño with cilantro, lime juice and salt and pepper in a large boil. Stir well and place in fridge until ready to serve.
  4. Start making the rice if you are using it
coconut lime rice pilaf
  1. Preheat oven to 350°F
  2. Heat clarified butter and olive oil in a 2 quart saucepan that is oven safe.
  3. Place coconut milk and coconut water in a pan and bring to a boil.
  4. Add onion and saute over medium heat until onion is flavorful and soft. Do not brown or caramelize
  5. Add rice and stir in oil to coat. Cook rice for 2 minutes.
  6. Add boiling stock to rice and cover
  7. Bake in a 350°F oven for 20 minutes.
  8. Remove pan from the oven and fluff with a fork just before serving
fish & serving
  1. Remove fish from the fridge and squeeze the juice of the lime over the top just before placing on the grill or in a grill pan on the stove.
  2. Grill fish until cooked almost completely through. Time will depend on the thickness of your fish.
  3. Put all the ingredients out and let everyone create their own perfect dish
Share this Recipe
Powered byWP Ultimate Recipe

Filed Under: dinner, grilling, recipes Tagged With: salsa, watermelon, wayfair

« Previous Page
Next Page »

Thanks for stopping by!

Every eater has a responsibility to make good food choices, learn to cook and pass all that information on to others. I created this blog to do my part and share my knowledge and my stories. If you ever have a question please don't hesitate to ask. Read More…

rss twitter pinterest instagram facebook mail

Signup for ideas on shared meals and connecting with people through food
* = required field

powered by MailChimp!

Subscribe to Blog via Email

Enter your email address to subscribe to this blog and receive notifications of new posts by email.

Help us start our own shared meal traditions

search

Top Posts

  • butterflying a pork shoulder
    butterflying a pork shoulder
  • homemade cake vs box cake showdown
  • cured meat platter
  • cilantro chili lime shrimp
  • how to store & eat: starfruit
Legal Disclosures and Privacy Policies
Wayfair Homemakers

Copyright © 2016 · Lifestyle Pro Theme on Genesis Framework · WordPress · Log in