how to store & eat: starfruit

how to store and eat: starfruit by wit wisdom & food


Starfruit Not the most original name for a fruit but descriptive. When I say starfruit you know exactly what I am talking about, chances are that you also have no idea what to do with it. You are good company. Matter of fact, people can’t even agree on the spelling of the fruit, is it starfruit or star fruit? I like one word so that is what I rolled with. Speaking of rolling, I would roll right past this cute little fruit. It had the texture of a grape with a sweetness similar to and apple/pear. Not at all a bad fruit just not that exciting that I would eat it frequently. If I were having a fancy cocktail party, which since I don’t drink probably won’t happen, but if it did I would cut these to spice up the garnish option. Limes are so yesterday you should go with starfruit.

Season: tropical, late spring and late fall

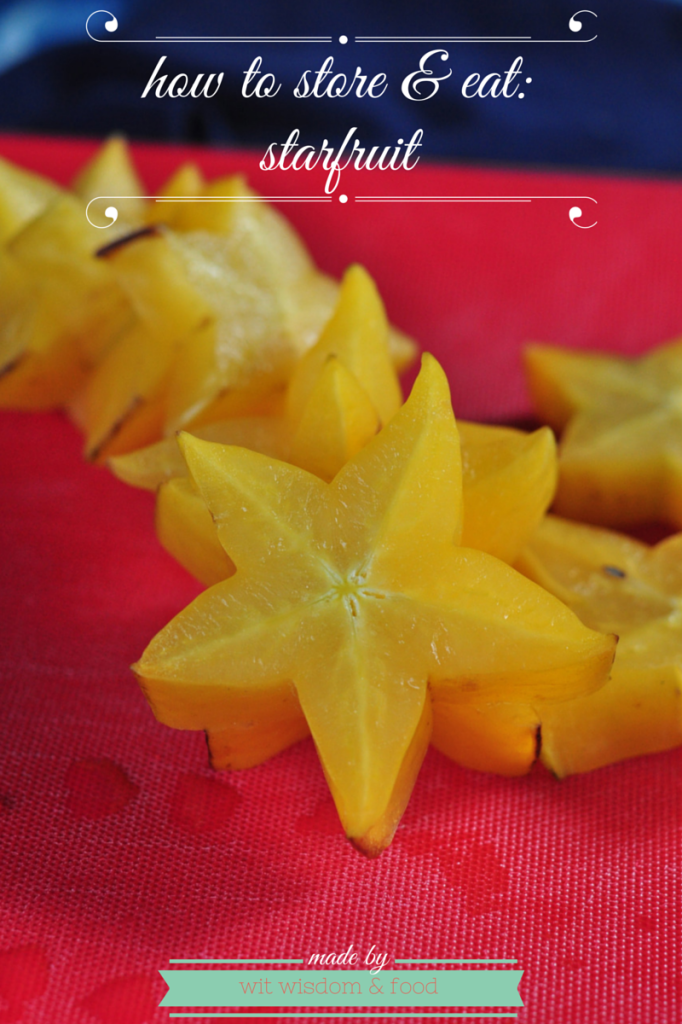
What to look for when you buy: A ripe starfruit will have brown edges at the points like you can see in my picture. The ripe fruit will also have lost most of its green tint and will be a nice pale yellow color. Over ripe starfruit will have brown spots. So it kind of ripens in the same stages as a banana.

How to store it: Store them on the counter at room temperature until they ripen. Once ripe you can store them in the fridge for up to two weeks. You can also freeze them which might come in hand for my fancy cocktail party idea.

How to prepare it: Simply slice the starfruit thin (1/8 inch), remove the seeds with a knife and eat like an apple slice. You can eat the skin and the flesh. I did see a few places mention cutting off the points of the star before you slice it. The fruit in my picture is much too thick you will want it a lot thinner.

How to use it: Throw it in a fruit salad, juice it, use as a garnish in salads or drinks.

Links to some great starfruit recipes:

Starfruit upside down cake- Not unlike a pineapple upside down cake this would just have a little more flare!
Startfruit sangria - It might make a fun holiday drink addition
Starfruit sherbert - If Iron Chef taught you anything it is that all ingredients can become a frozen dessert

one cake 9 sticks of butter

I am a sucker for magazines at the checkout counter and that is why in my Baker’s Dozen goals this year I vowed to cook from all of the magazines I purchase. I hoped it would curb my magazine buying and it has a little but when I see a best of issue of Fine Cooking they are hard to turn away from. Even harder are the pretty Martha Stewart Collectors edition like this Cakes and Cupcakes edition.

There are some amazing cakes displayed on these pages and the recipes in the back are great basics that you could turn into any cake creation of your liking. While I failed you by posting this after this issue is off newsstands you can order it by calling Martha Stewart Single Copy division at 1-800-274-6800.
I made the chocolate butter cake with the carmel butter cream. Which added up to a whopping 9 sticks of butter in one cake. We loved it at the house but like a lot of the sweets it went straight to work the next day. The crew never seems to mind getting our leftovers from the night before. Some people are still talking about this cake and it’s crazy amounts of butter.

I am still working on getting the lighting right during these evening photo shoots. The bottom photo of the icing is truer to the color. I thought that a carmel icing would have come out more of a butterscotch color but it had a nice carmel taste and it wasn’t overly sweet. The fact that the icing wasn’t too sweet was the most commented on aspect of this cake.

If you would like to make the frosting you can find it at Martha Stewart with great directions.
One of my favorite features of this magazine is that the basic cake recipes come with cooking times for different size cake pans and cupcakes. Below is the chocolate butter cake recipe just as it appeared in the magazine.

Chocolate Butter Cake

Recipe from Martha Stewart Living

1 1/2 cups (3 sticks) unsalted butter, room temperature, plus more for pans

3/4 cup unsweetened cocoa powder, plus more for pans
1/2 cup boiling water
3 cups cake flour (not self-rising), sifted
1 teaspoon baking soda
1/2 teaspoon salt
2 1/4 cups sugar
1 Tablespoon pure vanilla extract
4 large eggs, lightly beaten
1 cup milk

1. Preheat oven to 350 degrees. Butter cake pans (see bottom for more info)*; line wiht parchment. Butter parchment; dust with cocoa, tapping out excess. For cupcakes, line muffin tins with paper liners.

2. Stir cocoa and the boiling water in a small bowl until a smooth paste forms; let cool. Whisk together flour, baking soda, and salt in a medium bowl.
3. With an electric mixer on medium speed, beat butter and sugar until pale and fluffy, 3 to 5 minutes. Mix in vanilla. Add eggs in a slow stream, mixing until incorporated and batter is no longer slick.
4. Gradually whisk milk into cocoa paste. With mixer on low speed, gradually add both flour and cocoa mixtures to the butter mixture.
5. Divide batter among prepared pans, smoothing tops with and offset spatula. Bake until a cake tester comes out clean, according to the times below.

8-inch round layers 35 to 40 minutes

9-inch round layers 50-55 minutes
9-by-13-inch cake 45-50 minutes
cupcakes: about 25 minutes

Transfer pans to wire racks to cool 10 minutes. Turn out cakes or cupcakes onto racks to cool completely.

*Recipe yields enough for

Three 8-inch round layers
Two 9-inch round layers
One 9-by-13-inch sheet
3 to 4 dozen cupcakes